Posts Tagged ‘Airguns’

There has been a lot of buzz on the Internet lately about the Crosman NPSS (that stands for Nitro Piston Short Stroke) air rifle. Crosman sent me one in .177 caliber (.22 is also available) for review, and I found it pretty interesting in a lot of ways.

The first thing that sets the NPSS apart from the herd is its looks. It has an ambidextrous composite “thumbhole” stock that has a carbon-fiber-look “soft-touch” covering. A digital camo version is also available. Starting at the rear of the NPSS, you’ll find a ventilated soft black rubber butt pad. Moving forward, a soft rubber cheek piece wraps over the comb of the stock and down both sides. Moving forward again, there is a triangular hole in the buttstock that serves as the thumbhole.

The pistol grip has small bumps on either side (as does the forestock) that provide additional gripping surface. Just ahead of the pistol grip, the trigger guard is made of plastic and has a hole toward the rear edge, through which a screwdriver can be inserted for adjusting the length of the trigger’s second stage. The black trigger is made of metal, as is the Gamo-style safety lever (push forward to fire, pull back to safe the action).

Moving forward again, you’ll find the forestock, which has a screw hole on either side for securing the receiver and a slot down the middle on the underside to provide clearance when cocking the break barrel action.

Ahead of the forestock is the barrel, which swells from the breech block into a 7/8-inch matte-black-finished bull barrel. Moving back on the top of the NPSS, you’ll discover the breech block. Move back again, the shiny black metal receiver is fitted with dovetails for mounting a scope and a hole for engaging an anti-recoil pin from a scope mount. The extreme rear of the receiver is covered by a black plastic cap.

Included in the box with the NPSS is a CenterPoint 3-9 x 40 scope and a one-piece scope mount. To mount the scope, of course you have to take the tops off the scope mounts, and when you do, you need to take the smaller allen wrench included with the mount and use it to run the anti-recoil pin down so that it will engage the hole on the receiver. The NPSS weighs 9 lbs, 7 oz with the scope mounted and stretches 43 7/8 inches from end to end.

To cock the NPSS and open the breech for loading, pull the bull barrel down and back until it latches. Cocking requires about 27 pounds of effort, and this is where you’ll encounter the second thing that sets the NPSS apart from the herd: the gas-piston action (sometimes called a gas spring, and which Crosman calls a Nitro Piston) action. Because of the gas-piston action, there is no spring noise during cocking, and the air rifle can be left cocked for extended periods without worry about spring fatigue. Slide a pellet into the breech, return the barrel to its original position, and you’re good to go.

Next time, we’ll shoot the NPSS.

Til then, aim true and shoot straight.

– Jock Elliott

If you want to get rock-solid steady when you are shooting your air rifle or air pistol, here’s a piece of gear that you ought to know about. Called the Steady Aim Harness, the patent-pending device consists of a comfortable shoulder harness with a wide padded back support and a pair of padded non-slip knee straps. The shooter wears the harness over his clothes, and whenever he needs to make a high-precision shot, he simply sits down, slips the knee straps into place, and leans back. The Steady Aim Harness uses the body’s own weight in tension against the legs to create an amazingly stable and comfortable shooting platform that deploys in just seconds in the field.

Tom Price, inventor of the harness, says, “The military has known for a long time that the sitting position is one of the most stable for precision shooting, but it isn’t always consistently comfortable or stable. The Steady Aim Harness is as comfortable to wear as a fanny pack and nearly as stable to shoot from as a benchrest.”

The Steady Aim Harness is assembled from ballistic nylon straps and engineering grade plastic adjusters and quick release buckles that are fully adjustable to fit a wide range of sizes. An optional waterproof seat cushion, which is part of the Steady Aim Harness system, is available to increase comfort for extended sitting. The Steady Aim Harness and small cushion together weigh just two pounds.

This picture shows your humble correspondent wearing the Steady Aim Harness. The knee loops dangle in front of my thighs.

To get ready to shoot, sit down and drop the knee loops over your knees. It’s as comfortable as sitting in an easy chair. Here I am shooting the Diana LP8 two-handed with my elbows resting on my knees.

This shows me shooting a rifle-scoped pistol Crosman 2300S silhouette air pistol rested in the crook of my arm. The Steady Aim Harness is also useful when you need to do long-term observation of a game area from a seated position.

A number of field target shooters that I know use the Steady Aim Harness to help them shoot their rifles in competition more accurately. My brother-in-law and I both use Steady Aim Harnesses in competition whenever the rules allow. Above is a picture of me shooting an FX Typhoon in field target competition using the Steady Aim Harness.

Til next time, aim true and shoot straight.

– Jock Elliott

For the past several weeks, I’ve been shooting a new air pistol that I believe is a classic in the making. The RWS LP8, also known as the Diana LP8, is a break-barrel, spring-piston, single-shot air pistol that will replace the 5G pistol. Available only in .177, the LP8 stretches nearly 18 inches from end to end, weighs 3.2 lbs, and has an integrated top rail for mounting a scope or red dot.

The LP8 is set up a bit like the old powder burning Fireball pistol, which had a fair amount of the receiver rearward of the pistol grip and overhanging the shooter’s hand. The LP8 is designed to be ambidextrous. Both sides of the action are enclosed by a handsome matte finish black metal casting, and the pistol grip is enclosed by molded ambidextrous plastic grips. Further, on either side of the receiver, just above the grips, is a flip-lever safety. Truly, the ergonomics of this pistol will keep both lefties and righties happy.

At the very stern of the LP8 is a metal name plate that says “RWS.” Just above that, on top of the receiver, is a micro-adjustable rear notch sight with a fiber optic green dot on either side of the notch. Moving forward, you’ll find the rail for mounting a scope or red dot. (In the picture, you’ll notice that I used a Leapers 3/8-to-weaver adaptor to mount the red dot on my LP8, but I did that only because the only unused red dot that was available had weaver mounts.) The receiver measures nearly 11 inches from the front edge to the back of the pistol. Moving forward again, you’ll find the barrel and a muzzle weight with the front sight which has a red fiber optic dot.

Moving underneath the receiver, the trigger guard is an integral part of the castings that surround either side of the action. Inside the trigger guard is a metal trigger which has a grooved front surface. Underneath the trigger guard in a small hole for a screw that prevents trigger overtravel and should not be adjusted.

Loading the LP8 is dead easy: grab the muzzle weight from underneath (otherwise the front sight will poke you in the palm) and pull down and back until the barrel latches. This cocks the action and activates the automatic safety. Insert a .177 pellet into the exposed breech and return the barrel to its original position.

Now you’re good to go. Flip off the safety lever, ease the first stage out of the trigger and squeeze just a bit more. According to my Lyman digital trigger gage, out of the box, the first stage takes 2 lb 13 oz, and the shot goes off at 3 lb 11 oz, and I had no difficulties achieving satisfying accuracy with that weight of trigger.

The shot cycle is very smooth, and makes kind of a “doink” sound that is very neighbor friendly. You can hear some vibration, but you don’t feel it in your hands. On my Oehler chronograph, the LP8 was sending 7.9 gr. Crosman Premier Light pellets downrange at 558 fps average. That’s within kissing distance of an untuned Beeman R7 rifle. By contrast, my RWS 5G pistol launches the same pellets at 530 fps average. In an email, the folks at UmarexUSA told me they got the following results: RWS Hypermax 645 fps, RWS Hobby 560 fps, RWS Super H-Point 550 fps, and RWS Super Dome 500 fps.

Fooling around in my side yard, from a sitting position, and using a red dot (which is not the best choice for ultimate accuracy), I put five shots into a group that measured 11/16 inch edge to edge. Three of the shots were in a cloverleaf group where all the holes touched each other.

The bottom line is that I think the LP8 is one heck of an air pistol. It has power, accuracy, and it’s fun to shoot. My prediction is that a lot of airgunners will think the same thing and vote with their wallets.

Til next time, aim true and shoot straight.

– Jock Elliott

So what’s it like to shoot the Marauder? A whole lot of fun, that’s what.

You insert the magazine into the Marauder by pulling back the bolt then sliding the magazine into the slot in the breech from the right. About three-quarters of the way into the slot the magazine reaches a detent. Push a little harder and the magazine snaps into place. Push the bolt forward, and the bolt probe pushes the first pellet out of the magazine and into the barrel. (When you work the bolt after each shot, the magazine auto-indexes, and the number on the magazine “window” changes, so you always know what shot you are on.)

To disengage the safety, push it forward, toward the muzzle. (To activate the safety, pull it back, toward the trigger.) Ease the first stage out of the trigger. On the Marauder that was sent to me, only 1 lb 3 oz was necessary to take up the first stage. Squeeze a bit more, and the shot is triggered at 1 lb 10.9 oz. Even better, the Marauder trigger has adjustment screws for trigger weight, trigger position, and first and second stages. I loved the trigger just as it came out the box. It was crisp, predictable and light enough for me, so I made no attempt to adjust it. But it is my understanding that it is possible to adjust the Marauder trigger to as low as a 3-ounce single-stage trigger or a 6-ounce two-stage trigger.

When the shot is triggered, the Marauder seems very still with no noticeable muzzle flip or recoil. In addition, the barrel shroud works marvelously well. Shooting off a rest at a target 35 yards away, the two loudest things I heard behind the scope were the “ting” of the hammer spring and the “thwack” of the pellet hitting the target. I’m sure there must be some muzzle blast, but it is very, very muted – and this was from an air rifle that is launching Crosman Premier 10.5 grain pellets at over 900 fps.

The accuracy of the Marauder is top of the line. Shooting from a field target position at 13 yards, I was able to consistently blow the center out of a tiny circle that measures just a teensy bit over .177. From a casual rest, I put five shots into a group that measured half an inch from edge to edge. That’s about one-third of an inch center to center.

Not too bad for five shots from a casual rest. I'm pretty certain the Marauder can do better.

Now, at this point, the sharp-eyed reader will have noticed that I haven’t mentioned charging pressures, and that’s where the story of the Marauder gets really, really interesting. My Marauder is set up for a 3,000 psi fill, and it will deliver 40 shots at over 900 fps (high, 986; low, 913) with Crosman Premier Heavies or 30 shots (high, 1067; low, 1021) with Crosman Premier Lights.

This spreadsheet shows three different ways the Marauder can be tuned for a 2,000 psi fill.

But the Marauder is also a very “tunable” air rifle, with adjustments for velocity as well as hammer spring preload and hammer stroke, which determine what fill pressure should be used. Using these three adjustments, the Marauder can be tuned for various fill pressures and velocities. As the chart below shows, with a 2,000 psi fill, the Marauder can be set up to deliver 50 shots between 612 and 644 fps or 30 shots between 828 and 887 fps or 20 shots between 898 and 960 fps, all with 7.9 grain pellets. Further, with all three of these “tunes,” the Marauder uses no more than 500 psi of air, making it very easy for the shooter to pump back up to 2,000 psi. And at a 2,500 psi fill, the Marauder can be tuned to deliver 40 shots between 863 and 900 fps as an example of another tuning option.

To me, the Marauder combines everything I admire in an air rifle: excellent accuracy, excellent trigger, and extremely quiet report. It’s a gun that can be set up for hunting, field target competition, or virtually inaudible minisniping in the back yard. With all that going for it, I think a lot of airgunners will find it irresistible.

Til next time, aim true and shoot straight.

– Jock Elliott

With the introduction of the Benjamin Marauder this year, Crosman Corporation has defined a new sweet spot in the price/performance curve for PCP air rifles. As I stated in my last blog, it has everything I would want in a trip to Santa’s lap – it’s astonishingly quiet, wickedly accurate, has an excellent trigger, and it’s a repeater . . . all for about $500.

Note to photographers: taking pictures on a windy day can result in a lint-covered blanket.

We’ll get to all the neat stuff pretty soon, but first let’s take a tour of the Marauder. The Marauder measures 43 inches end to end and weighs 7.5 lbs, according to the factory specs. Available in .177 and .22, it’s a precharged 10-shot bolt-action air rifle that can launch .177 pellets up to 1100 fps and .22 pellets as fast as 1000 fps.

At the extreme aft end of the Marauder is a ventilated tan rubber recoil pad, separated from the ambidextrous hardwood stock by a white plastic spacer. Just forward of that, underneath the buttstock is a stud for mounting a rifle sling. Moving forward again, there is a laser-checkered pistol grip with a palm swell on each side and a black plastic cap on the end.

Moving forward again, you’ll find a plastic trigger guard that houses a fully adjustable metal trigger and a metal safety lever. Just ahead of the trigger guard is a bolt that holds the action in the stock. Forward of that is the air pressure gauge. Moving toward the muzzle again, you’ll find the word “Benjamin” laser carved into the stock and, beyond that, another stud for mounting a rifle sling. Each side of the forestock is laser-checkered, and the end of the forestock slants backwards (somewhat similar to the RWS 54 spring-piston rifle).

Beyond the end of the forestock is the air reservoir. At the end of the reservoir are a barrel band (which connects the reservoir to the barrel shroud) and a cap which unscrews to reveal a male Foster fitting for charging the reservoir from a SCUBA tank or hand pump. Beyond the end of the reservoir is the barrel shroud inside which is a choked steel barrel.

Moving back along the barrel shroud, you’ll find the aluminum receiver which is dovetailed for fitting a scope and has a prominent slot for the ten-shot magazine. At the aft end of the receiver is a large steel bolt handle. To me, the fit and finish of the Marauder are entirely appropriate for an air rifle in this price range.

The only other significant part of the Marauder is the magazine, which holds 10 pellets and is self-indexing. That means it contains a small spring inside that rotates the next shot into position when the shooter works the bolt.

Loading the magazine is a little tricky the first time, and there is an excellent video that can be found at http://www.crosman.com. Nevertheless, here’s Uncle Jock’s quick tutorial on how to load the magazine.

First, look at the picture of the magazine below. Notice the white spot near the lower left corner of the clear plastic cover. That’s where a bump on the black plastic main body of the magazine engages a small recess on the clear cover.

Now push the clear plastic cover up slightly and forward so that it rotates clockwise and disengages from the bump on the body of the magazine. The picture below shows the cover rotated off the bump.

Next, rotate the cover clockwise as far as it will go, until the forward edge of the cover encounters the bump again like the picture below.

Now, push the cover clockwise a little more so that it rides up over the bump and a hole in the base of the magazine appears through the slot in the cover as the picture below shows. (In case you’re wondering, the clockwise rotation of the magazine ‘winds up’ the spring in the magazine so that it will self-index each time you work the bolt.)

Put your finger under the hole and drop a pellet in nose first. Now rotate the cover counterclockwise off the bump. The spring pressure of the magazine will now hold the pellet in place, and you can remove your finger.

Next, as you rotate the cover counterclockwise, additional pellet bays will appear under the hole in the plastic cover. Drop pellets in nose first until the cover is rotated back to its original position.

The magazine is now loaded. In Part II, we’ll see how the Marauder shoots!

Til next time, aim true and shoot straight.

– Jock Elliott

The left side of the Crosman 600, showing the built-in magazine just forward of the rear sight and the cocking slide just below the magazine.

For years I had been hearing about the Crosman 600 pistol, how neat it is, how it is a classic. I had seen pictures of the 600, and I had read rave reviews of them in the online forums, but I had never shot one until just the other day.

The good folks at Airguns of Arizona had picked up a 600 as part of a massive buy of vintage airguns. This particular 600 had some seal problems that needed to be sorted out. When the repair was completed, AoA asked me if I’d like to give it a try before it went on to its rightful owner.

Sure, I said, and a few days later Brown Santa delivered a box containing the Crosman 600. The 600 stretches about 9.l75 inches from muzzle to the end of the receiver and 5.5 inches from the top of the receiver to the bottom of the pistol grip. The sample I played with weighed 2 lbs 10 oz unloaded. The entire 600 is amazingly solidly constructed out of metal. The only plastic that I could detect are the target-style grips.

The 600 was introduced in 1960, and, according to DT Fletcher’s book, 75 Years of Crosman Airguns, was produced until 1970. A flyer or advertisement from 1960 reproduced in his book calls the 600 “the world’s most advanced pellet pistol. . . Revolutionary! . . . 10 shots in less than 3 seconds . . . with match target accuracy.”

It goes on to say: “Patented, fast, boltless Swing-Feed loading . . . Gun holds on target; no lag, no sticking, no jump . . . Top target accuracy.”

The built-in magazine with the slide back, reading for loading.

Having now shot the Crosman 600, I can only say that it lives up to the marketing material. To get it ready for shooting. Unscrew the cap on the end of the air tube under the muzzle. Insert a CO2 powerlet with the neck facing outward. Screw in the cap which has a piercing pin. Next, push the slide on the built in magazine all the way back and lock it in place. Carefully feed in 10 .22 caliber flat nose pellets (I used Beeman .22 H&N match wadcutter pellets) so that the head of pellet faces toward the muzzle. Release the magazine slide and pull back the cocking slide just below it until it latches.

The righthand side of the Crosman 600.

Now you’re good to go. Ease the first stage out of the trigger. Squeeze a bit more, and at 2 lbs 3 oz, the shot goes down range with a solid “Pop!” In the same instant, the action cycles, readying the next shot and cocking the action. Squeeze the trigger as fast as you like, and the pellets go effortlessly down range. This is quite simply the fastest, easiest rapid-fire air pistol I’ve ever shot. (Although, of the modern crop of repeater air pistols, the Beretta PX4 Storm acquits itself very well. I’ll be writing about it in another blog.)

The Crosman 600 truly is a classic. If you are luck enough to own one, take good care of it and enjoy it often, because it is absolutely a pleasure to shoot.

Til next time, aim true and shoot straight.

– Jock Elliott

Let’s suppose, just for fun, that in a moment of high spiritedness you decided you’d like to really turn some heads the next time you visit the range or go out slinging lead with your airgunning pals.

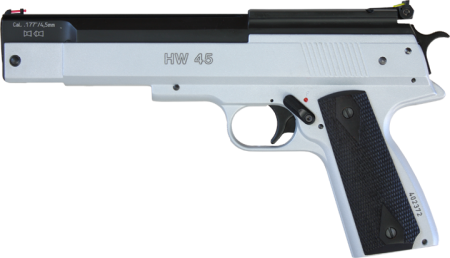
The HW45 STL is just flat gorgeous.

Let me humbly suggest that an HW45 STL might just be the item you need to do the trick. The STL is the two-tone version of the HW45/Beeman P1 pistol, and – to my eye, anyway – with its black upper, stainless-look lower, and black grips, is one gorgeous piece of goods. In addition, the STL has those micro-adjustable fiber optic sights that I found so useful on the .20 cal P1 pistol.

The STL is available only in .177 caliber and is functionally identical to the Beeman P1 and P11 in .177. That means you can probably expect an STL to launch Crosman Premier 7.9 gr. pellets at around 520 fps. With Beeman Laser 6.5 gr. pellets, you might see velocities around 550 fps and with Dynamic SN1 7.95 gr. non-lead pellets, about 490 fps.

I was chatting with classic airgun collector Mike Driskill, and he pointed out some things about the HW45/P1 and its variants that I hadn’t really thought about before.

“If you look at the HW45,” he says, “the piston works backwards. A pistol like the RWS P5 is like a scaled down breakbarrel rifle. You crank the barrel down to cock the gun, and you’re driving the piston and spring back, toward the palm of your shooting hand. When you trigger the shot, the spring and piston rocket forward, just like a break barrel rifle.”

Driskill added, “But cocking the HW45 or P1 is totally different. You pull back the ‘hammer’ to release the rear of the upper, and then you pull the rear part of the upper up and forward to cock the pistol. While you’re doing that, you’re actually dragging the spring and piston toward the muzzle of the pistol until they latch.”

“Now, here comes the really interesting part,” Driskill says. “When you trigger the shot, the spring and piston leap toward your hand . . . and you remember what Newton said about equal and opposite reactions . . . that means this will tend to push the nose of the HW45 forward. Since the action sits above your gripping hand, this in turn rotates the muzzle downward. When the piston comes to a stop, the nose of the gun pops up, which is all you really notice when firing since it all happens so quickly. But the pellet already left the muzzle when it was being shoved down.”

He adds, “If you view the HW45 from the side, you’ll notice that the rear sight is higher than the front sight. That’s to compensate for the pistol’s tendency to shove the nose down. And if you happen to have one of the Beeman P1s with the two cocking slots for dual power levels, you’ll notice that it shoots higher . . . a lot higher . . . if you use the lower power cocking position. That’s because, at lower power, the nose of the pistol isn’t being pushed down so much. So be careful, very careful, if you decide to experiment with lower power.”

While we were on the phone, Driskill told me an anecdote that underscores the need to respect the power of the HW45. A friend of Mike’s one day discovered he had a possum in his attic that was in urgent need of removal. He figured he would use his HW45 to stun the possum, thereby making the eviction process easier. He took careful aim at the shoulder, triggered the shot, and killed the possum instantly.

Now don’t get me wrong; I’m not recommending the HW45 STL for routine possum hunting, but it’s worth remembering it can pack quite a wallop.

Til next time, aim true and shoot straight.

– Jock Elliott

The IZH-46M.

To ready the 46M for shooting, grasp the grip in your right hand and grab the end of the cocking handles with your left. Pull the cocking handle away from the grip until it extends well in front of the muzzle. When the cocking handle reaches the limit of its travel, the bolt will pop open. Next, return the cocking handle to its original position. This pressurizes the action.

The IZH-46M with the pump lever fully extended.

The breech ready for loading.

Slide a pellet into the rear of the barrel and press the bolt down until it snaps into place. The 46M is now ready to fire. Raise the pistol, alight the sights, take the first stage out of the trigger, and squeeze. With a pop, the pellet goes downrange. Velocities with light pellets are nearly 500 fps. An earlier model, the IZH 46 (no M), had a shorter pump tube and typically produced velocities 50 fps slower with pellets of the same weight.

The best part of the Izzy is the trigger. It is crisp, clean, and adjustable to below a pound. For the price, I know of no other air pistol that delivers a trigger as good, and I believe you’d have to spend much more to do better.

To get ready for the next shot, pump the action again and go through the same routine. I shot a season of 10-meter air pistol competition with a 46M and never had a mechanical problem or failure of any sort.

This is Steve Ware's IZH-46M configured for Unlimited Standing Silhouette. Photo courtesy of Steve.

But as I indicated in Part I, there is a lot more you can do with an IZH-46M beyond 10-meter air pistol. Steve Ware has twice won the IHMSA Unlimited International Championship with an IZH-46M, and once he won the Pan American Unlimited Standing Championship with an IZH. He likes it because it is economical, accurate, not dependent on SCUBA tanks or CO2 caplets, and can be adjusted to a sub-one-pound match trigger with just a screwdriver.

Charles Cammack uses his IZH-46 for air pistol benchrest competition in the New Mexico Senior Olympics Dona Anna County. For the last four years, he as qualified to shoot in the state summer games and has won several gold and silver medals in both the county and state games.

Larry Bowne uses this IZH for silhouette and pistol field target. Photo courtesy of Larry.

Larry Bowne uses his IZH-46M for both air pistol silhouette and field target competition. It’s quite a treat to seen him dropping field targets at the Easter Field Target Competitors Club in Wappingers Falls, NY, with the same model pistol that I used for 10-meter competition.

Bowne uses a custom scope mount made by Fenton Sandlin, an experienced silhouette shooter. Sandlin’s custom intermounts for the IZH have built-in droop that compensates for the height of the scope and the trajectory of a low velocity pistol. (Another way to mount a scope or red dot on the Izzy is to use the B-Square #17900 IZH-46 Weaver Adaptor Rail.)

After trying a lower power scope, Bowne mounted a Bushnell Trophy 6-18 scope with a scope knob that is calibrated out to 55 yards. His IZH-46M shoots JSB 8.4 grain exacts at 440-450 fps. He experimented with lighter JSB Express pellets, but found the heavier 8.4 grain pellets more stable for shooting groups at longer distances. Using this setup, Bowne has knocked down field targets with a 1.5 inch kill zone at 40 yards, which is impressive indeed. (This is not hearsay, either; I have personally seen him do it.)

If it seems like I am very keen on the IZH-46M, you’re right – I am. It is darned-near a do-it-all air pistol. The trigger is excellent. The accuracy is superb. You don’t have to worry about recharging it with air or CO2. It’s extremely easy to shoot well. You can compete in multiple disciplines with it and even control small pests at close range. It’s very difficult to think of any other pistol that offers so much at such a reasonable price.

Til next time, aim true and shoot straight.

– Jock Elliott

I had to grin the other day. Somebody had posted on the Forum, asking the denizens of the forum their opinion on three single-stroke pneumatic target pistols. One of them was the Baikal IZH-46M. The chorus of response to the posting was almost unanimous: Buy the Izzy!

When I mentioned this to Greg at Airguns of Arizona, he wasn’t surprised in the least; the IZH-46M is the most popular air pistol AoA sells, by a wide margin. So what is it about this Russian-built air pistol that makes it so popular?

It certainly doesn’t have the swoopy good looks of some of the high-buck
European match pistols . . . so what is it? I think it is simply that the Izzy hits a very sweet spot in the price/performance curve.

For less than $400, you get a wickedly accurate, self-contained match pistol that does a lot of things well, including 10-meter air pistol competition (that’s what it was designed for), pistol field target, air pistol silhouette, and I even heard of one fellow who shoots bench rest with one. In addition, if the forums are any indication, a number of Izzy shooters use them to control small pest animals at close range in the back yard.

The first thing you notice about the Izzy is that it has a very purpose-built air about it. If a part doesn’t need to be polished to function well, then it isn’t. Every part is designed with just one purpose in mind: to launch pellets down range as accurately as possible.

At stern of the 46M is a wooden ergonomic right hand grip that I found quite comfortable in my hand. (If you are a lefty, or you simply want dress up your 46M, custom laminate right or left hand grips and cocking handle are available from Airguns of Arizona.) At the bottom of the grip is an adjustable palm shelf. On top of the grip is the rear sight, which can bed micro-adjusted for windage and elevation. If you want a different width notch on the rear sight, the back plate of the sight can be unscrewed and flipped to give you a choice of notch widths.

In front of the rear sight is the bolt, which flips up to allow you to load a pellet into the rear of the barrel. There is a sliding assembly on top of the barrel that allows the bolt to be unlatched without cocking the gun and pressurizing the action. The barrel extends forward to a clamp that connects the barrel with the pump tube beneath. At the muzzle there is an assembly that holds the removable front sight blade and protects the barrel crown.

The pump tube is underneath the barrel. Beneath it, the cocking handle extends toward the trigger then angles away to the bottom of the palm shelf. At the end of the cocking handle is a small wooden block that cushions the hand while pumping the action. Together with a small metal shelf, the cocking handle encloses the two-stage adjustable trigger.

That’s all there is to the IZH-46M – a simple, unassuming, but highly functional air pistol.

Next time we’ll look at shooting it.

Til then, aim true and shoot straight.

– Jock Elliott

I cocked the unloaded, uncharged Crosman 2240 and handed it to my testing partner. “Give the trigger a squeeze and tell me what you think,” I said.

A few seconds later, the action clicked, and he said, “It’s kind of crummy.” I tried it and agreed. With a trigger gauge, we measured the weight of the trigger pull at four-and-one-quarter pounds.

To improve the trigger, we decided to install the Adjustable Trigger Sear for the Crosman 13xx and 22xx. Along the way, we learned a bunch of things that will help you install one on your own airgun. (Note that the Adjustable Trigger Sear [ATS] is not a factory authorized part.)

To get ready for installation, Make sure the gun is not cocked or loaded. Lay the 2240 on its left side with the pistol grip pointed toward you, and the muzzle pointed to the right. Next, remove the grip by removing the screw that holds it in place.

With the grip removed, you’ll see a view like the picture below.

With a pair of needle nose pliers or the blade of a screwdriver, slide the coiled spring off the post. When the spring is off the post, tug gently on the spring, and you will be able to remove it completely from the pistol. Additional note: you can defer removing the coiled spring until after you have removed the trigger side plate, but having the side plate still in place reduces the chances of parts being launched into the air (see note about cranky uncles below).

Before you do anything else, make sure the safety is in the FIRE position – protruding fully from the left side of the pistol with the red stripe show. Prop the pistol’s air tube up on a pad of paper or a paperback book – something that will elevate the air tube about one-half inch. This will prevent the safety from being pushed into the SAFE position. If the safety is pushed into the SAFE position when the side plate is off the trigger assembly, a tiny silver ball bearing and teensy spring will fall (or worse – FLY!) out, and YOU WILL HAVE THE DEVIL’S OWN TIME TRYING TO GET THEM BACK INTO POSITION! (Please believe Uncle Jock on this. It happened to me, and it made me very cranky).

Next, remove the two screws that hold the trigger side plate, and gently remove the side plate. In the picture below, you’ll see the original sear that sits on a pivot pin just to the rear of the trigger (in this picture, the original sear is overlaid on the ATS.) Remove the original sear but leave the pin in position. (Just to the right of the sear, you’ll see that teeny spring that I told you about.)

Put the ATS in position as shown below. Notice that it wraps below the pin that the original sear pivoted around, but unlike the original, the ATS doesn’t have a hole that the pin can be inserted into. This is true despite the fact that some ATSs have holes that might appear to fit over the pin. They don’t.

Put the trigger side plate back in position. Slide the end of the coiled spring over the end of the sear, and then slide the other end over the bottom post. You’re done, except for adjusting the trigger and replacing the grip. (Note: you can attach the coiled spring to the ATS and the post with the side plate removed, but I think it is easier with the side plate holding the sear and post in place.)

To adjust the trigger, follow the instructions that came with the sear.

In the end, the ATS tranformed the trigger in my 2240 from a creepy 4-1/4 lb affair into a very crisp trigger that sends the shot down range at just 1 lb 15 oz.

What to do if the little ball bearing and spring fall out. Make sure the safety and trigger are in proper position. Replace the trigger side plate. Remove the two screws that hold the trigger assembly to the air tube. As you look down on the trigger assembly from the top, you’ll see a small hole just above the safety. Drop the small ball bearing in the hole, then place the small spring on top of it. Now reattach the trigger assembly to the air tube. This will compress the small spring and hold it in place.

Note about Screw Starting Point Adjustments

The final, optimum adjustment of the 1st and 2nd stage screws will be determined by experimentation and a combination of the shooter’s personal taste with the particular manufacturing tolerances of the specific gun. Still it’s sometimes useful to have a starting point for the fine tuning process – kind of a home base – that represents average reasonable settings that the sear can be easily set to in order to begin the process in an orderly way, and reset to if the process goes awry.

Starting Point settings are defined so…

1. Turn the screw being set so that the tip is exactly flush with the surface of the sear.

2. Turn the screw clockwise by the number of turns (and fractions of a turn) indicated in the figure.

Here are Starting Point settings for the three styles of Crosman sears. To identify which style you have, check for:

1. Presence of the two fabrication alignment holes present in styles A and C but not B.

2. The square “heel” of style A that B and C lack.


Til next time, aim true and shoot straight.

– Jock Elliott